Mounting Brackets Pt 2
The pictures here are close ups of the bracket design. I struggled with this part of the project and as you know, ended up making 3 brackets in all because I wasn’t happy with the second one.
I used the 2nd one for these photos so it's unfinished, but the only differences are that I ground the welds smooth and finished the profiles off a touch neater. It's not obviously twisted but a vernier gauge sees everything, so I ended up with a tedious process of measuring the caliper/disc clearances and hand filing a third mount to get it right. That is slow work but you get there in the end.
The dimensions are only of use for this specific caliper and disc combination, but they do give a feeling of what's involved.
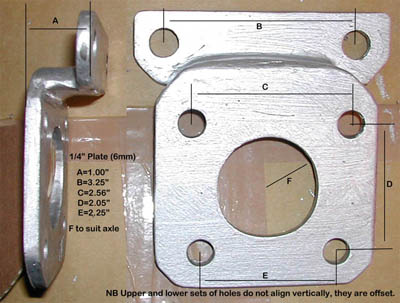
Prototype Mounting Bracket
The mounting holes for the hub carrier bolts were taken off a paper template made from the drum brake backplate, so again there will be some approximation in the dimensions.
I can't stress enough that if you do this sort of thing, don't take my measurements as gospel truth but make your own templates !
Trial Caliper Mounting
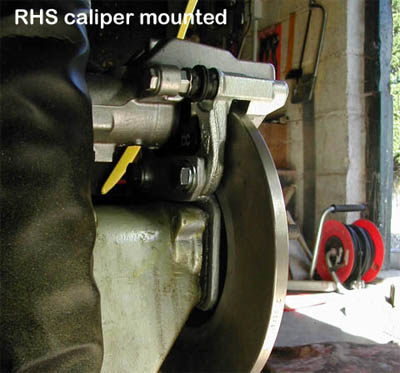
These last two pictures show the RHS caliper mounted with the hub & disc in place.
The first shows how close the carrier plate of the bracket is to the top hat section of the disc, it actually protrudes slightly inside the section.
It could be slightly smaller with more clearance of course but I don’t think it’s that critical.
I wanted as much metal as possible for the welds in the rest of the construction so I derived these dimensions by bolting an oversized carrier plate to the hub carrier, mounting the hub/disc assembly and marking where they met. (Photo on previous page)
As I've said before, there’s no Rocket Science here....
The caliper brackets proved much more of a problem than I'd expected and underlines the fact that you really do need machine tools to make these things inside any acceptable timescale. They looked good to my first measurements but during final inspection after mounting everything firmly I found that although one was acceptable the second wasn't so good.
I had differing disc to caliper body clearances at the front and rear of one caliper, which meant it was slightly twisted. And Scrap. Once more unto the bench dear friends…..
The second picture shows the caliper at a slightly different angle, which is how I made most of the final measurements and adjustments.
I mounted everything up tightly and using a vernier gauge measured the distances between the caliper body and disc at both the front and rear of the caliper body.
This checks that the caliper pistons (and pads) will be parallel to the disc itself, something I thought important although I’m sure a small amount of deviation will be workable. But I want the pads wearing evenly and not at an angle, so it was worth doing in my eyes.
You could also use feeler gauges for this operation, but whatever you use it’s got to be accurate, I was working to 0.001” plus or minus my personal skill levels with the tools.
Trial Caliper Mounting
Click on the button for the Handbrake stage