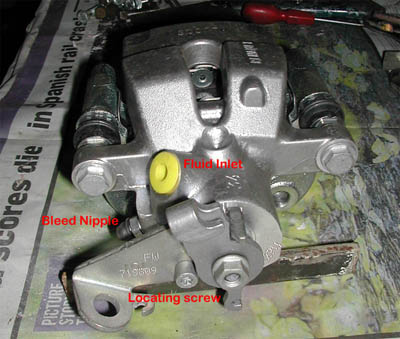
The Handbrake
Because the caliper is designed to be mounted almost vertically the handbrake actuation mechanism also needed some modification to allow a smooth run of the cable to the caliper. In the first of the two photos below you can see the caliper before and after modification.
Just leaving it at the OEM design would mean the outer cable is kinked quite sharply by the radius arm and apart from looking a bodge, it probably wouldn’t work very well either.
The actuating arm is on splines, so that can simply be moved to whatever angle you desire, but the cable stop is bolted to the caliper and in order to get the best angle for the cable run, it needed modification.
Caliper Handbrake Mechanism as supplied
But nothing too serious, just a small section welding on, re-drilling and bolting back in place.
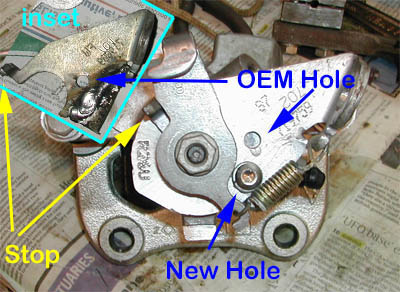
Caliper Modifications
The top LHS inset in the 2nd image shows how small the required extension was in practice
I didn’t take any measurements at this stage, it was more “make it up as you go along” engineering.
After welding on an extension to the cable stop and decided where it should be drilled by holding the cable in the smoothest arc on the car.
I also added a return spring to the actuating arm. The calipers came without one, but given the long run of cable we have on the Europa, it seemed reasonable to give some spring assistance to the arm.
Well, we're almost there, we just need a handbrake cable now.
I'm sure you could manage with the Lotus handbrake cable but having gone to all this trouble I prefered to make a custom cable that looks as if it's made for the job.
In the end I made two barrel nipples which fit snugly into the caliper actuating lever, and soldered them on the cable.
I made the nipples from mild steel rod, 8mm with a 3mm hole for the wire and a 5mm drill in the upper part to allow the wire to be splayed out before topping off the upper part with solder.
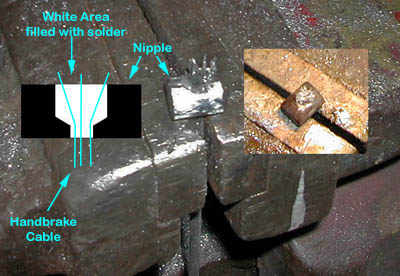
Soldering the Nipples in Place
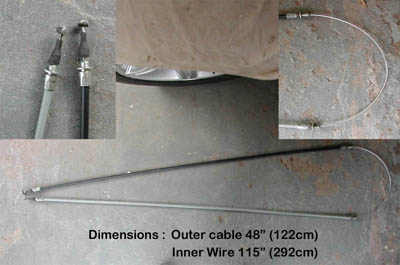
The New Handbrake cable Arrangements
I don't know if that's the way they are made, but my logic was that you're not relying on the shear strength of a soldered bond between the wire and a straight hole as you would be if it was just soldered into a 3mm hole.
If you wanted to pull out the wire now, not only would you need to overcome the shear bond but also somehow compress and pull the splayed end through. I think I'd need to eat a lot more spinach to do that trick....
The last photo here shows the final dimensions of the new cable wire and outer sheaths. It would have been nice to have them both the same colour, but c'est la vie.
Click on the button for the Final Assembly stages